makebootable
08.02.2009 - What and why and how to do it manually
Usual question: "I've dd'ed the image to somewhere and now it doesn't boot". Usual advice: "You have to make it bootable by using makebootable". Usual reaction: "Ehm, ok how do I do that?". Since this type of question comes up quite frequently, let me try to explain a bit of background on that pseudo-mystical tool "makebootable", how you can get it and how you can manually make a partition bootable without even needing makebootable.
The Stage 1 Bootloader
Ok, what we are really talking about here is the stage 1 bootloader. It is a tiny bit of software that is written to the start of a partition or disk. It is where either the BIOS or the boot manager will jump to to get the OS booted. In the case of Haiku this stage 1 bootloader loads a bit of the BFS partition the installation is on and locates /beos/system/zbeos. zbeos is the stage 2 bootloader, which provides the boot menu and loads the kernel. In the case of a missing makebootable we never get to that stage 2 bootloader.
If you want to look at it from the code side you should check out "src/system/boot/platform/bios_ia32/stage1.S". It's nicely commented and pretty straight forward to follow. But let me just explain the rough outline:
- 1. Set up a few basics, clear registers and store the drive id
- 2. Check if we have disk extension provided by the BIOS
- 3. Load the rest of the stage 1 bootloader
- 4. Validate the BFS superblock
- 5. Search the stage 2 bootloader on disk
- 6. Load the stage 2 bootloader into memory
- 7. Run the stage 2 bootloader
When we enter the stage 1 bootloader we have the following available: the first block of the stage 1 bootloader, so the first 512 bytes. What we do from there is execute steps 1-3. Even though the stage 1 bootloader is only a tiny bit of software, it's not tiny enough to fit completely into one 512 byte block. That's why it is split across the first and second block of a partition (with the BFS superblock sandwiched between the two parts at the start of the second block).
Where we fail with a missing makebootable is step 3. This is the first time we need to load something from disk. To do that we use the BIOS disk services that provide us with a simple interface to load stuff from disk into memory. We are always accessing the disk here, and not the partition. This means, when we want to load the second part of the stage 1 bootloader, we need to instruct the BIOS to load the block "where we are" + 1. And that's exactly the important part here "where we are", i.e. where the first part of the stage 1 bootloader is. The thing is, we do not know where the first part of the stage 1 bootloader is on disk. We don't know the needed offset to get from the start of the disk to the partition we are booting from. Therefore we can't calculate the location of the second block and subsequently the location of the BFS structures.
So how do we get to know that offset? Simple: it is written into the stage 1 bootloader using makebootable. The only thing makebootable does is to find exactly that partition offset and write it into the bootloader at a specific place (bytes 506-510 to be exact), so that the first part of the stage 1 bootloader is able to calculate the correct offsets into the disk.
When you start out with a normal Haiku disk image, the offset is simply initialized to 0. With that background you should now be able to understand why it works to dd a raw image to a raw device and get it booted. It works because if you write the image at offset 0, this is the same offset that is present in the image. If you write it to somewhere else, i.e. you write the image to a partition instead, meaning the disk offset is not 0, the stage 1 bootloader will still try to read from offset 0 + 1, because that's what is written into the bootloader. So this won't boot.
The makebootable Tool
As mentioned the purpose of makebootable is to write a stage 1 bootloader to a partition and supply it with the correct partition offset. The problem makebootable has to solve is to be available on different platforms and be compatible with the different ways of finding the partition offset. Each OS has its own API for that, that's why makebootable has to be explicitly ported to make writing directly to a partition work. So far it's been ported to linux, FreeBSD, Darwin and of course BeOS and Haiku. On unsupported platforms (like on Windows or Solaris for example) you therefore can't use makebootable to do it automatically for you.
On supported platforms however you can build makebootable using the command "jam \<build\>makebootable". This will build makebootable for your host platform and you can then run it from "generated/objects/<buildPlatform>/x86/release/tools/makebootable/platform/bios_ia32/makebootable" giving it the partition you want to make bootable ("/dev/sdc4" for example). This will output the partition offset that is written to the stage 1 bootloader.
Note that if you have a BeOS or Haiku installation you can use makebootable from there. The BeOS stage 1 bootloader is a bit different, but it's compatible with the Haiku stage 1 bootloader, as it loads the stage 2 from /beos/system/zbeos as well. So on these platforms just run "makebootable /dev/disk/...". You can run makebootable with a path of a mounted volume as well, so if you mounted the target partition at "/HaikuStick" you can as well do "makebootable /HaikuStick".
If You Can't Use makebootable
If you can't use, or don't want to use makebootable, you can of course do the partition offset thing manually. For example if you are on Windows and want to make the second partition of your USB drive where you dd'ed the image to bootable. What you need for that is a hex editor. If you can get one where you can access the raw disk directly that's the best situation, otherwise you have a few steps more.
The first step is to find out what the partition offset in blocks is. If you have some tool to get that information from, get it from there. You either need the offset in 512 byte blocks or the offset in bytes and then divide that by 512. If you don't have a tool that can display the offset, you should be able to read it from the partition table in the master boot record (MBR). If you have a hex editor allowing you to access the raw device at offset 0 (where the MBR is located) point it there. If not, use dd to read the MBR into a file (something along "dd if=/dev/sdc of=mymbr.bin bs=512 count=1" in case of Windows take the "Partition0" thing, they really mean raw device by partition 0) and open that in the hex editor. Now when you're looking at that MBR you gather the partition offset from the partition table. The layout is documented for example at Wikipedia, but since that is a lot of info for a small task, let me explain that the partition table starts at offset 446 (0x1be) and has 4 entries of 16 bytes. Each entry being:
- 1. Active flag (1 byte, 0x80 = active 0x00 = not active)
- 2. Start offset in cylinder/heads/sectors (CHS) format (3 bytes)
- 3. Partition type (1 byte, 0xeb for BFS, but it doesn't really matter)
- 4. End offset in CHS format (3 bytes)
- 5. Start offset in logical block address (LBA) format (4 bytes)
- 6. Partition length in blocks (4 bytes)
What we need from that is the partition start offset in blocks. This is exactly what field 5 holds for us. Note that this is a little endian 32 bit integer, but as the format is the same in the stage 1 bootloader it doesn't matter at all. Just note down that number for the partition you want to make bootable. The direct offsets to those numbers are 454, 470, 486 and 502 for primary partitions 1, 2, 3 and 4 respectively. If you're doing logical partitions here, you'll have to figure out how to get that offset yourself, sorry.
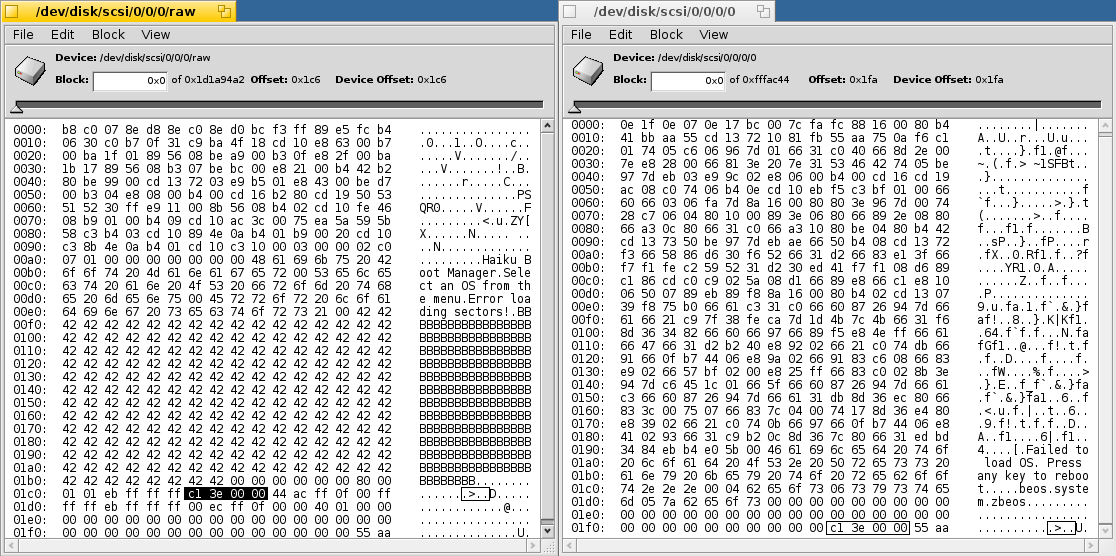
When you finally have that offset, you can either patch it directly on the partition if you have a hex editor that allows that or you simply patch it in the haiku image you started with and afterwards dd it to your partition again. In any case you point the hex editor to the first block of the stage 1 bootloader (the first block in the image file or on the partition) and write down the partition offset number at offset 506, just so that you don't touch the 0x55 0xaa at the very end of that block. If you have the partition offset as a number read from a tool, convert it to hex and write it there as a 32 bit little endian integer (i.e. reversed so an offset of 0x01020304 would result in the bytes 0x04 0x03 0x02 0x01 at offset 506). Just to explain it a bit more graphically here's a screenshot of DiskProbe under Haiku with the two relevant parts selected. On the left the MBR and on the right the partition with the same offset.
Native GCC 4.3.3 for Haiku
01.02.2009 - Tales of updating the GCC4 port
Impressive how I could skip the whole 2008 in this blog ;-)
Out of no real particular motivation I wanted to build a native GCC4 for Haiku. We've had a GCC 4.1.2 cross-compiler for a pretty long time now, but since there were some issues with GCC4 built Haiku installations and especially since there never was a native toolchain for GCC4 based Haiku, it has always been a second class citizen. You could experiment around with it and we've had hybrid builds able to use software for both GCC2 and GCC4 Haiku on the same install, but since you had to use the cross-compiler to build GCC4 Haiku apps it's always been a bit less convenient that just building for GCC2 Haiku. But there's a lot of software around that simply can't be built using GCC2 anymore. The reason for that being the use of coding conventions or simply features that weren't available in GCC2. So a native GCC4, meaning a GCC4 running inside Haiku and building GCC4 Haiku apps, is a really important thing to have for porting and building many future applications.
Since I briefly looked into updating the GCC4 cross-compiler in summer 2008 already (without getting very far because of lack of time), I already knew pretty much what to get and where to get it. I also already built a diff between the vendor and trunk version of the 4.1.2 cross-compiler in the buildtools repository. So I had a rough idea of what I needed to touch to get things going.
I was about to build a native GCC4. This means that I was going to build it on Haiku itself. Of course you could actually cross-compile a native compiler in a two step process on another platform as well. But since I use Haiku as my main and only operating system here, this was no real option. So this meant that a GCC2 Haiku with a GCC2 compiler would be the host for all the fun. Considering that GCC is a huge project, consisting out of many subprojects and thousands of source files, this would be a pretty tough stress test for Haiku. I wasn't even sure if the GCC 2.95.3 we are using was up to the task, but it turned out that this didn't pose any real problem.
One of the less convenient things about the GCC 4.3 series is that they require two external libraries: GMP and MPFR. Both are multiple precision math libraries. I won't pretend to have any idea on what they do or what they're used for, so I just accepted the fact that those were two dependencies to get first. Luckily both libraries are pretty much self contained and easy to port. The only thing I needed to do was to update the config.guess and config.sub scripts to a version that knew about Haiku as a target platform. The rest was the usual "configure; make; make check; make install". I configured them with just "--prefix=/boot/common" and they built and installed fine.
Encouraged by that smooth process I went on to GCC. The first questions come up right away when configuring. GCC has lots of configurable parameters and I wasn't really sure what to put there. Luckily I could just peek at how the cross-compiler scripts in the repository configured GCC 4.1.2. So I came up with "CFLAGS="-O2" CXXFLAGS="-O2" configure --prefix=/boot/develop/tools/gcc-4.3.2-haiku-090121 --target=i586-pc-haiku --disable-nls --disable-shared --enable-languages=c,c++" as my configure line. Yes, that's a configure invocation directly in the GCC source dir. Not really having any experience with this type of build system and of course only reading the (very good) configuration instructions after the fact, lead me to do the configure directly in the root source dir. The funny thing is that this little error later on would uncover a bug in libiberty that is now reported in the GCC bug tracker with a patch attached.
Since we are on platform "i586-pc-haiku" and are compiling a GCC for target "i586-pc-haiku" this means we're doing a native build. This also means that bootstrapping will be enabled resulting in a three step process: First a pseudo GCC is built that is a subset of a complete GCC just capable enough to actually build the full GCC. Through that process you don't actually compile GCC4 directly with your host compiler. This means that using our GCC 2.95.3 as host and more exotic compilers on other platforms just have to be able to build a working subset of GCC. This lessens the dependency on the host compiler and exposure to any potential issues in them.
The second so called "stage" is then to build a full GCC4 using the compiler built in stage 1. When creating a cross-compiler the process would end here. But since we're bootstrapping, there is a stage 3. Stage 3 essentially rebuilds the whole GCC4 again, this time using the compiler built in stage 2. This is to verify that the compiler that was built is actually able to build working programs. And this also explains why the process can't have a stage 3 for cross-compilers - if the compiler created in stage 2 is a cross-compiler creating binaries for other platforms you obviously can't use it to build a stage 3 compiler running on the host again. When the stage 3 compiler is built, the build system will verify that both compilers are valid. It does that by simply comparing the object files created by both stages. As both stage 2 and stage 3 compiler are built essentially by the same code, the resulting object files should be identical. If this verification passes, optional parts of the GCC4 package like the libstdc++ are built and the process is done - that's our goal.
I started out with a plain unzipped tree of GCC 4.3.2 (yep .2) sources. So before going anywhere I would need to actually port that GCC of course. Using the diff I had produced of GCC 4.1.2 this was pretty straight forward though. Some things have moved, but you could easily track them down.
Now I could start the whole process and it would actually get pretty far already. Some minor tweaks here and there and it would build the stage 1 compiler. This was the easy part, because now things started to go strange. Since the GCC built in stage 1 uses the config that you set up, you will notice misconfiguration when building the stage 2 compiler with it. And it seemed pretty misconfigured. First, things were found that weren't actually there and I started patching and changing ifdefs in some of the files. This was about when I really needed to go to bed and leaving it for that day. Thinking about it more and more while in bed and in the morning I came to the conclusion that this can't be it, that this would never create a proper patch and that there must be a root cause why things were failing this way. So instead of any further patching I started looking at the config.log to find out why configure would detect stuff that wasn't there. Now there are basically two things that are commonly done: 1. checking if a certain header/function/variable/define is present and 2. whether or not a certain symbol (function entry point in a library) is available. The checks that were looking for headers and prototypes did work. It does the checks by spitting out small source files and trying to compile them. So if you are looking for a header that isn't there compilation of the test program will just fail. The checks for available symbols however did not fail, the test programs simply compiled and linked.
That was when it became pretty obvious. Knowing from prior experinece that there was the option to allow or disallow missing symbols I figured that the configuration I set up would simply allow missing symbols. This meant that the test programs would compile and link, but wouldn't be able to run, because the stuff they refer to simply isn't in any library the system provides. This does however go unnoticed, because configure doesn't try to run the binaries, it simply checks if they compile and link. I then took a look at the specs and the theory turned out to be true, there was no -no-undefined present. BeOS did partially allow undefined symbols, that is they allowed undefined symbols in libraries but not in executables. This was done because they were linking their libraries with symbols not available at compile time. They were later runtime patched to be available. Some might remember the libroot.so.patch which patched the memset/memcpy to an optimized version depending on the CPU found. So -no-undefined was conditionally added for executables in the BeOS specs. Since we don't really want undefined symbols for Haiku, I've just added -no-undefined to the specs unconditionally. Should this later pose a problem, this can easily be changed in the sources or overridden in a custom specs file.
So with the updated builtin-specs I restarted the process, rebuilding much of the pseudo-gcc as well as starting the stage 2 compilation again. Now the configure looked much better, it only found what was there and I could remove all the hacks I've put in the different files. But of course this wasn't the only problem. Now it started with undefined stuff like "NAME_MAX" and "PATH_MAX". Anyone more or less familiar with the matter should now be able to tell: your limits.h is missing or messed up. And it was missing of course. I checked the diff and saw that there was an overridden variable for the test to find limits.h. For some reason I don't clearly remember I removed that line and replaced it with NATIVE_SYSTEM_HEADER_DIR instead. I think it was because the GCC build system tried to find the system headers in the default "/usr/include", which is of course not correct for Haiku. Anyway I got it working by moving some stuff around. Since I did all of that mostly during the timeframe I should have slept instead you have to bear with the fact that I wasn't always fully awake and don't remember all the details. After all they are pretty boring anyway.
So after the basic config was corrected I actually got the stage 2 compiler built. And since the stage 3 is essentially the same as stage 2, this one ran through equally well. This meant I finally had a native GCC 4.3.2 for Haiku. We're done, start the party! Ehm not quite of course. Having GCC 4.3.2 was of course a big step, but the real goal was to have a GCC4 Haiku running the GCC4 compiler natively. And I was still on GCC2 Haiku and since this wasn't even a hybrid build, the new GCC4 couldn't even compile anything runable that used C++.
Instead of party the goal now changed to get Haiku compiled with that new GCC. Since, as mentioned, we're on a non-hybrid GCC2 Haiku, the compiler can't be just dropped in as a replacement for GCC2. You still have to use GCC2 for compiling the host tools required by Haiku. This means setting up the Haiku build using GCC2 as the host compiler and just using the native GCC4 as if it was a cross-compiler. Since the Haiku build system supports such a setup, this was not very hard to do. But of course this is the latest point you could possibly notice that you forgot something. I didn't forget it, but mostly didn't care so far. Having GCC is by far not everything you need to build binaries. The only thing GCC does is it produces assembler output for the target architecture. It does that through the GCC frontend and it's language backends and a lot of optimization tricks and maybe a bit of black magic, but in the end it only produces assembler output. The rest of the process, meaning creating object files from that, archiving them into a static library or linking them into a binary is done by the binutils. The binutils are run as a separate project and provide the ld, as, ar, nm, objdump, ranlib and strip. It's the binutils that actually understand the ELF format for example. The good thing about the binutils being separate is that you can update them individually. Since I knew that we had more or less up to date binutils already (2.17) I was just lazy and instead of building the current version (2.19) I just copied the old ones into place so they could be used with the GCC4 I had set up.
So off you go with the Haiku build. But I didn't get very far. Of course Haiku was buildable with GCC 4.1.2, but we are updating two minor versions here. Many things have changed and especially many things have become more strict than in previous versions of GCC. So this meant that I wouldn't only have to update GCC and eventually the binutils, but that I would have to fix all the issues to make the Haiku tree compilable with the GCC 4.3 series as well. Luckily I've found porting guide explaining most of the issues I ran into and offering solutions. You can see the process in Haiku r28981 through r28995.
Success, I now got a bootable GCC 4.3.2 built Haiku. I've set it up to produce a hybrid build and then I was shutting down to go to the "other side" booting into the GCC4 Haiku. Just to add some emphasis to this, I did that whole process up to now in two sessions. I used Haiku to build a monster project, did update Haiku sources and checked them in while always reading webmail in Firefox, doing research to find solutions to the upcoming problems, chatting on #haiku and listening to music. All under Haiku, a still pre-alpha operating system. We're talking heavy workloads and uptimes of up to 20 hours here after all.
Surprisingly booting into that GCC4 installation worked out of the box. There have always been some stability issues with GCC4 built Haiku installations, so I didn't expect too much stability. But it turned out that besides three unexpected sudden reboots, things would go smoothly. Again we're talking uptimes of up to 20 hours. In principle I wouldn't have had to rebuild GCC4 again, because this thing is pure C code. So even though it was compiled on and for a GCC2 host, it wouldn't matter at all. Call me paranoid, but I still wanted to rebuild GCC4 on GCC4 just to make extra sure that we really have a fully native toolchain in the end. So I created a fresh unzipped tree and applied the patch I made for my final GCC 4.3.2 sources. Expecting to just start the process again and ending up with a proper fully native GCC4. After all this should pretty much exactly the situation of the stage 2 in the previous build, so why should it fail?
But of course it failed miserably. It failed even before compiling anything, because it claimed that the C compiler wasn't able to build binaries. Huh? OK, going through config.log it seemed as if the compiler toolchain wouldn't work. The C compiler backend "cc1" wasn't found. Tried to reproduce that testcase, I wasn't able to. It worked perfectly fine, with exactly that file. So, running a pre-alpha OS I started suspecting a problem with Haiku. Of course it was strange that this wouldn't turn up when compiling Haiku with exactly that compiler. So I was digging into the sources and added debug output here and there. Chatting with Rene Gollent we took appart some of the stuff that was going on. GCC claimed that it tried to execlv (I think) "cc1" but it didn't work. So we were looking through the whole path such a call takes. We didn't spot anything obvious. After a bit of more testing it turned out that exactly this test case would only fail when run inside the root source dir of GCC. Going through it systematically I copied over the files from that dir into a testbed and checked if it would still compile. It did. So I went on creating subdirectories analogous to the ones in the source tree. And there it was: as soon as there was a "gcc" directory, things would fail. Easy, the binary is called "gcc" and there is a subdir called "gcc", it must be that Haiku tries something executing "gcc" and thinks that directory is executable, which it is of course because the executable bit on directories means "traverse ok" and not "execute ok". But looking at the sources it was exactly this case that was handled! So the bug simply didn't seem to be in Haiku.
Then you have to work from the other side. I looked up what was actually called on the GCC side. And it really was "cc1" and exec. And it really couldn't find it, because it obviously wasn't in the source dir. After a bit of searching through the sources and trying to make sense of the things I saw I came to the conclusion that the prefix that was computed must simply be wrong. And tracking the prefix creation down I arrived at a pretty familiar block of code. The code looked almost exactly like the code in Haikus exec implementation. That's because it resolved the binary path using the PATH environment variable. But the difference was that exactly the directory case where X_OK is set but it's not a regular file at all wasn't handled. So this was a bug in libiberty which caused it to fail to resolve the path to the own gcc binary, making it unable to resolve the relative path to the "cc1" binary as well. Funnily I was only able to find that by doing the configure from the directory where you shouldn't do it at all. So I patched that, registered at the GCC bug tracker and submitted a bug with a diff. You can see it here, turns out another reported bug was reported that exhibited the same issue, but they didn't track it down to that problem yet.
Having this issue resolved, I was able to rebuild the whole GCC4 and build a fully native one. By that time the GCC folks released GCC 4.3.3, so I made a new diff, dumped my GCC 4.3.2 tree and started over again. Since Haiku hasn't really been optimized yet, we're talking build times of 3-4 hours here. Anyway I got it working straight from that patch again. This time I also wanted to get the current binutils, so I made a diff of the 2.17 binutils we had in the buildtools trunk and applied that (by hand, I like doing that because I can then more clearly see what's going on and if something nearby may need attention as well or if something can actually be left out). Binutils were friendly and built pretty much right away. So that really was a success. A native GCC 4.3.3 plus current binutils 2.19. I packaged it up, uploaded it and added it as an optional package ot Haiku.
The rest of the story was updating binutils and GCC in the Haiku buildtools repository through my totally crappy internet connection, a hundred attempts to fix configuration issues for the cross-compiler setup and finding issues that other platforms exhibited when building those tools. You can find that in the commits and in the bug tracker, so I'll refrain from prolonging this story.
Now we have a native, up to date GCC and the current binutils for Haiku. This should open up the door for a lot of exciting stuff. Ports of software that weren't feasible before because of using GCC2 and optimizations in Haiku that weren't available back then. Have fun!
Using the Haiku USB stack
19.04.2007 - The what and where of using the Haiku USB stack
Mainly in the second half of the last year the Haiku USB stack has matured a great deal. Not only has it stabilized a bit, it has also seen the addition of an EHCI driver to support USB 2.0 devices. A rewritten UHCI driver and a new implementation of the USBKit library are other steps to a complete stack.
The reason to write about that is the following: An increasing number of people apparently get interested in the progress of Haiku USB and they start to ask questions about the completeness and usability of the stack. Also whether and how to use the Haiku USB stack under R5 is an interesting question. Instead of telling the story individually it probably makes more sense to sum everything up in a post for everyone to read. I'll try to show what is currently implemented and working and where missing parts or possible problems could arise.
Here's an overview about everything USB that is available from Haiku:
- The USB bus manager module(s) - They provide the unified interface to the USB from the driver perspective
- The UHCI/OHCI/EHCI bus modules - Provide the hardware specific interface to the USB bus manager
- The USBKit library and its raw driver - Provide an interface to use the USB from userspace
- USB drivers - They use the USB bus manager or the USBKit to support specific devices
As you can see there is more to USB than just the busses or drivers. The good thing is that most of the parts are quite independent of Haiku and can be used under R5 and up as well. The components are mostly independent of each other too so that it's not an all or nothing thing if you want to profit from Haiku USB. I've split the following discussion into the parts that can be installed separately and list for each one what you can gain or lose by installing it and how to do it.
The USB stack
The stack alone only consists of two components, the bus manager and the bus modules. As mentioned above the bus manager is the module that provides the USB interface to the kernel level drivers. Actually the Haiku USB bus manager provides two modules, the "bus_managers/usb/v2" and the "bus_managers/usb/v3". Internally both use the same code and most of the v2 functions are mapped directly to the v3 functions. The two modules are provided so that drivers that were developed under R5 and use the v2 API can work beside drivers written for the newer v3 USB API of Dano and up. Both APIs are very similar in general. The biggest difference between the two is that the v3 API uses usb_ids to identify handels to internal stack objects instead of giving out direct pointers. This serves stability and eases debugging of stack and driver problems.
The bus modules namely UHCI, OHCI and EHCI can be counted to the USB stack as well. They are the parts that implement the hardware specific interfaces and provide things like the virtual root hub. The bus manager will search for these bus modules on bootup. Each one will initialize and register itself (if it finds supported hardware).
Pros and cons of installing
When you replace the R5 USB stack with the one from Haiku you can gain USB 2.0 support through the EHCI module. On the other hand you will lose support for OHCI as, at the time of this writing, the OHCI host controller driver is not yet implemented. That means if you have an OHCI controller installed and use low or fullspeed USB devices (mice or keyboards most of the time) you will not want to install the Haiku USB stack just yet. You can find out what devices are present in your system by using a command like "listdev | grep USB". This will list all the installed controllers in the format "PCI bus, device #_: Serial Bus Controller (USB) [c|3|x]", where x is the PCI class_api field indicating 0 = UHCI, 10 = OHCI or 20 = EHCI.
Also note that none of the bus modules currently support isochronous transfers. If you have working USB video or audio hardware (webcams, mics), it most likely uses isochronous transfers. Such devices would cease working when you switch to the Haiku USB stack.
Getting the binaries
See below if there are prebuilt packages for your platform. If not, you will need a checked out Haiku tree and the corresponding build tools to produce the binaries. From the base directory you can build the individual components for your platform by a command like "TARGET_PLATFORM=r5 jam usb \<usb\>ehci \<usb\>uhci". You need the backslashes to escape the less and greater than signs and you should replace the "r5" platform by "bone" or "dano" as required. This command should build the modules that can then be found under "generated/objects/<platform>/x86/release/add-ons/kernel/".
Installing the binaries
The first thing you should do before installing the new binaries is to archive the old ones. The original USB stack components can be found at "/boot/beos/system/add-ons/kernel/bus_managers/usb", "/boot/beos/system/add-ons/kernel/busses/usb/uhci" and "/boot/beos/system/add-ons/kernel/busses/usb/ohci". You need to move all of these files out of the add-ons tree and archive them in a zip somewhere.
You can now go to "generated/objects/<platform>/x86/release/add-ons/kernel/bus_managers/usb" and copy the "usb" bus manager module to "/boot/home/config/add-ons/kernel/bus_managers". Also the bus modules "uhci" and "ehci" need to be copied from "generated/objects/<platform>/x86/release/add-ons/kernel/busses/usb" to "/boot/home/config/add-ons/kernel/busses/usb". After that you can reboot and see if anything still works. I've been using this stack for months now without problems (or at least without problems I couldn't fix), but your system might just be unsupported. Be sure to leave a report in the forum linked below or open a bug report if you encounter problems. If everything works you can of course leave a note too. If you are unable to boot after installing the new stack you should disable user add-ons in the bootmenu and then remove the binaries and move the old ones back in.
USB mass storage module
There is the USB mass storage module (or rather USB-SCSI bus module) that exposes mass storage protocol compliant USB devices as normal SCSI disk to the system. They can then be mounted or partitioned as normal drives.
Pros and cons of installing
The USB mass storage driver should bring you mountable USB memory sticks, working card readers and access to MP3 players if they use the USB Mass Storage protocol and are compliant enough. There shouldn't be any downsides when installing this module.
Getting the module
Use "TARGET_PLATFORM=<platform> jam usb_scsi" to generate the usb_scsi bus module. The built module can be found under "generated/objects/<platform>/x86/release/add-ons/kernel/busses/scsi/usb/".
Installing the module
If you have any other USB mass storage module installed currently you should first store it away to reduce the risk of problems. You can then go to "generated/objects/<platform>/x86/release/add-ons/kernel/busses/scsi/usb" and copy the "usb_scsi" module to "/boot/home/config/add-ons/kernel/busses/scsi". After a reboot you can try out your mass storage device and see if it works.
The Haiku USBKit
Haiku includes a rewritten USBKit implementation. It should be fully compatible with the existing implementations, but fixes some bugs and enables getting more information from some devices. If you are currently using the USBKit (i.e. the USBKit.a static library) you can try to replace the implementation you have with the one from Haiku. When you do this you should also install the usb_raw driver from Haiku.
Pros and cons of installing
If you are implementing software that uses the USB from userland you can profit from some fixes in the Haiku USBKit. As a normal user you should not really notice a difference in using a different usb_raw driver and you cannot change the USBKit that is used by software as it is linked in statically.
Getting the binaries
You can use "TARGET_PLATFORM=<platform> jam USBKit.a" to generate the USBKit static library. It will be placed into "generated/objects/<platform>/x86/release/libs/usb/". Use the "headers/libs/usb/USBKit.h" header from the Haiku tree with this library. Most of the functionality the library provides is documented in that header file.
Note that you will also need the usb_raw driver for the USBKit to work. It is encouraged that you use the Haiku usb_raw driver with the Haiku USBKit, but it is not mandatory. The Haiku USBKit should work with the older usb_raw drivers from Be as well. To build the Haiku driver use "TARGET_PLATFORM=<platform> jam usb_raw" which will place the driver into "objects/<platform>/x86/release/add-ons/kernel/drivers/bus/usb/".
Installing the driver
Installing the usb_raw driver is as easy as copying it from "objects/<platform>/x86/release/add-ons/kernel/drivers/bus/usb/" to "/boot/home/config/add-ons/kernel/drivers/bin" and creating a link to it in "/boot/home/config/add-ons/kernel/drivers/dev/bus/usb". You can verify that the driver is installed correctly by "ls /dev/bus/usb" you should then see some numbers and the "raw" entry.
Other USB drivers
There are other USB drivers in the Haiku tree that could just be useful to you. There is the usb_hid driver and things like usb_midi. I don't know how well they will work if they build for R5 at all as I didn't test them. You will have to try and see for yourself here. For other non Haiku USB drivers you should be able to install them as normal. Ususaly you will have to put them under "/boot/home/config/add-ons/kernel/drivers/bin". They should work with the Haiku USB stack the same as before. If they don't please let me know.
Prebuilt packages
There are packages available with the Haiku USB stack and mass storage module as well as a standalone source package with the Haiku USBKit. These will only work with R5 or BONE installations respectively. The USBKit source archive includes a makefile that should build a USBKit.a that can then be used with the included USBKit.h header. To install one of the binary packages make sure you follow the steps above to archive your existing USB stack and mass storage module. Then unpack the package to "/boot/home" this will put the binaries at the right place. The USBKit sources can be unpacked and used anywhere.
Problems and Bugs
If you encounter problems with the Haiku USB stack please report them either in the forum linked below (if you have problems installing / using the stack) or open a bug report at haiku-os.org (if you think you've found a bug in the stack). When making a bug report please try to be as specific as possible and include syslog output, hardware configuration and other information that might be relevant for finding the problem at hand.
Comments
Haiku USB stack infos and status
08.08.2006 - To inform you all of the current status of the Haiku USB progress
As you may know from watching the Haiku commit logs, I have picked up the development of the Haiku USB stack again. I started working on USB in May 2006 where I took over the work of Niels Reedijk who did the groundwork for the USB stack and the UHCI Host Controller Driver.
I should probably start by explaining what parts there are to Haiku USB and how they interact. Lets look at the example of a USB mouse. The seamingly simple task of getting some mouse movements to the cursor at the screen is in reality quite a complex undertaking that involves many different components.
First of all, you have the hardware. The USB mosue connected to a USB port, which is wired to the USB controller which is then further connected by some sort of system bus. This system bus is, from the Haiku side, managed and programmed by a bus manager module. In most cases this will be the PCI module where the USB host controller is hooked up to. From there on we need a driver for the host controller - the Host Controller Driver or HCD. The software interface to the host controller is defined by the Universal, Open and Enhanced Host Controller Interface (UHCI, OHCI and EHCI) and depends on the hardware that is used. The Open Host Controller specification was made by Compaq and was the one initially adopted as the standard by the USB Implementers Forum. Intel developed another standard, the Universal Host Controller. Only Via licensed this standard. This means that you will find UHCs on most mainboards with Intel or Via chipsets and OHCs on all other chipsets and on most PCI add-on cards. EHCI is used when there is an Enhanced Host Controller, meaning support for Hi-Speed USB (USB 2.0). An Enhanced Host Controller (that only supports hi-speed) is always accompanied by a companion host controller to support low and full-speed devices. This companion host controller is then again either a Universal or Open Host Controller. This means that we will in the end need three host controller drivers in Haiku: UCHI, OHCI and EHCI.
To manage these different HCDs and to provide one unified public USB API to the system there is the USB stack. It gets called by other drivers via the public API found in the usb_module_info. The stack builds the logical device tree, registers and notifies drivers and delegates incoming transfers to and from the individual HCDs. The stack provides raw access to the USB devices and implements the logic to get and set different configurations, interfaces and alternates. This is done mostly by standard device requests.
The public API and the logical devices are then used by the next step, the device drivers. In the case of the USB mouse we need a driver for the USB Human Interface Device standard, which specifies how keyboards, mice, joysticks, gamepads and other input devices shall report their state and changes to the system. In the case of Haiku this driver is called usb_hid (there is also ps2_hid for PS/2 devices). This driver is loaded by the input_server, then registers itself in the USB stack using the usb module and installs notify hooks. These hooks are called by the stack when USB devices are added to or removed from the bus. Also the add hook is called for all already connected devices when the notify hooks are first installed by the driver. So the usb_hid driver gets to know the connected USB mouse and starts to send requests. It requests the device and report descriptor, which describe what type of device and what information is to be expected. For example how many buttons there are and if a scroll wheel is present. As soon as the mouse is found to be a valid USB HID it is published to the devfs (as /dev/input/mouse/usb/0 for example) and opened by the input_server.
The input_server now starts to request data from the mouse. The usb_hid driver blocks on that request as long as there is no data, and returns a nicely interpreted input message as soon as there is data. To know when exactly there is data it has to queue an inbound transfer. In the case of the USB mouse we talk about interrput transfers, because there is only periodic input from such devices. There are also isochronous, bulk and control transfers. Isochronous transfers are used to support non garanteed delivery with a constant throughput for webcams and audio devices mostly (it's like UDP in the network space). Bulk transfers are used for high data volumes when using USB mass storage devices like USB sticks. Control transfers are used to manage devices, setting device configurations, changing device settings and such. They are also used to do the whole adressing and registering stuff that happens when devices are connected to the bus and enumerated by the USB stack.
Well, anyway, so the usb_hid driver queues an inbound interrupt transfer. It does this by providing a buffer to fill the incoming data into, a callback function that shall be called when the transfer is done and a cookie that shall be returned in the callback. This information is then passed to the public API call queue_interrput() and processed by the USB stack. It registers the transfer (so that it can possibly be canceled later on) and passes it on to the apropriate Host Controller Driver. When the device now sends interrupt data on the corresponding endpoint, it gets filled in a temporary buffer (by the Host Controller) and is copied to the buffer that was provided by the usb_hid (by the Host Controller Driver). Then the transfer is finished and the associated callback is called with the result, the buffer, the actually transfered length and the cookie. In the callback the usb_hid driver now interprets the incoming data according to the USB HID specification and builds up the proper packet to send to the input_server. After that it puts the finished packet on a ring buffer and wakes up the blocked input_server thread that waits for events. The input_server now again interprets the incoming packet from the usb_hid, does its work and notifies the app_server about the event which then invalidates the cursor and redraws it at the new location (simplified ;).
This is the path and infrastructure that has to be in place to get a simple move of a USB mouse into the system and to transform a click to an actual action inside the OS. Now what of that is in place right now?
- USB stack: Done to about 80% - Most of the public API is implemented and works
- UHCI Host Controller Driver: Done to about 75% - All except isochronous transfers is in place
- OHCI Host Controller Driver: Not done yet - There is a skeleton driver in the tree
- EHCI Host Controller Driver: Not done yet - Needs to be written from scratch
Let me tell you the good news: I can (at home) actually use my USB mouse to navigate Haiku. This is possible since I have a UHCI companion controller in my Enhanced Host Controller. The bad news is that it works only for a short period of time because of a yet to be found memory leak somewhere in the Host Controller Driver.
My plans are now to finish implementing UHCI and fixing some more bugs so that all is stable for interrupt transfers. This will enable USB input devices under Haiku for anyone with a Universal Host Controller. Another short term goal is to support bulk transfers, which will bring USB mass storage support and support for other protocols like PTP for some cameras. Since the infrastructure is in place implementing bulk transfers is not a big task. Then I will move on to implement the OHCI Host Controller Driver. With this Haiku USB should be mostly USB 1.1 capable. The longer term goal is then to implement EHCI and adapt the stack to hi-speed. This should bring full USB 2.0 support. I cannot really tell how long this all will take, but basic USB support will be in Haiku coming the next few weeks.
If you wonder why those changes have not yet shown up in the haiku commit logs, this is simply because I currently do not have any internet connection at home. They managed to disconnect my home phone line for over a week by now. The reason is that I'm currently moving and that something went wrong with the request to move phone numbers and the DSL line. I hope this issue will get sorted soon so that I can commit my work.
Comments
Beep
12.04.2006 - Yes, this was a year with no updates to this blog at all...
I just wanted to update this once again with some Haiku news. In this last year much has happend in and around Haiku. Huge progress has been made in most of the areas. We got from the last screenshots here (below) with just a graphical Terminal to a full desktop with Tracker and Deskbar. Many fixes, a new rendering backend, more correct font handling, some new designs, a new BMessage implementation and thousends of other fixes and implementations brought together now form a quite impressive system. Stability and functionality went up a great deal and binary compatibility really starts to materialize. More and more bug reports mention R5 applications crashing. But this does mean that they are actually able to run at all (no missing symbols) and I'm sure that there are applications that work just fine. I did some tests myself with the sample-code applications of R5 and most of them work as expected. If you happen to have a supported sound card you can even get some sound out of Haiku using native codecs that for example decode your MP3s. If properly configured (currently SSE seems broken) VLC also plays videos for you. I suggest visiting John Drinkwater's flickr gallery for a good overview of what has happend and what is now possible.
Another thing that works now is drag & drop. I was able to correct the remaining troubles in the message delivery and fixed a critical bug in my BMessage implementation that caused corruption in ReplaceData() and was responsible for some crashs. With these fixes you can now select a part of your picture in ShowImage and drag it around, drop it to ShowImage itself or create a clipping on your desktop. You can even choose the clip format as you would on R5. Textual drag & drop from BeIDE to StyledEdit works too, albeit only in one direction as our BTextViews do not yet support draging something out.
I hope to spend some more time in Haiku over the next months and fix remaining problems and optimize performance. Message passing by area is one of those things. It makes especially sense in the drag & drop case as when you drag something, the drag message will be attached to each mouse moved event. This currently requires flattening the message on the server side, sending it and unflattening it in the client. As mouse move events usually reach a pretty high frequency, this is not really optimal. A single read-only area where a BMessage can simply be attached to instead of the flatten/unflatten thing should greatly reduce the overhead.
This just as a small news update. Maybe I'll find the time to do this more regularly again - but don't count on that.
Comments
There is progress, yes
10.04.2005 - Do not misinterpret the absence of updates as an absence of progess. There are even two new things to report today.
This time some quite fundamental changes happened to the stuff I reported about earlier. As you maybe know, Haiku is able to use the graphics hardware on it's own to draw to the screen. The app_server used to use an accelerant for this and used the AccelerantDriver as an Interface. Well, this has changed a bit by now. The internal design of the app_server-drawing-backend has been split up into two "ways" of drawing. The first way of drawing uses a DisplayDriver based class that does the drawing (using Be's app_server into a BWindow/BView, a BDirectWindow or an accelerant for example). The other way to draw something is to draw (using a graphics library for example) into an offscreen-bitmap and then copy the result on screen. As you guessed we currently work on the second path, as it has some advantages the first one doesn't.
Painter was an application written by Stephan Assmus (known from WonderBrush) that provided BView-like drawing functions, but instead of letting the app_server draw everything, it also used the AGG-Library which is a 2D rendering engine that provides more than enough functionallity to do BView drawing. In addition to that, using AGG allows for antialiasing to be implemented very easily. By now, Stephan has integrated the Painter into the Haiku app_server and a Painter-based DisplayDriver (called DisplayDriverPainter) has been created. Instead of having a DisplayDriverImpl based class like AccelerantDriver and using the accelerant for direct graphics output, the DisplayDriverPainter uses a HWInterface to connect to the hardware. This HWInterface can be a virtual one, like the ViewHWInterface, which looks pretty much the same as the ViewDriver and that uses a BWindow with a BView to display the rendered graphics. But despite looking similar to the end user, the ViewHWInterface and the ViewDriver do have quite different tasks. The ViewDriver did just instruct the (BeOS) app_server to do the drawing that was requested by the (Haiku) app_server. In contrast to that the ViewHWInterface does much less. It does only copy the final result of drawing operations onto the screen.
So who does the drawing? The drawing is now completely appart from the blitting (the "showing on screen") and is done by AGG into a suitable backbuffer. This backbuffer can be a BBitmap or just a raw block of memory. When drawing of something has finished, CopyBackToFront() is called, which copies the result from the backbuffer to a suitable frontbuffer. A suitable front buffer in this case is for example another BBitmap, block of main memory or a block of graphics memory. This is where the AccelerantHWInterface comes in. Based on the AccelerantDriver it again connects to the accelerant to do graphics output. It provieds the AccelerantBuffer, which is a frontbuffer that can be used under Haiku, as it does not depend on the BeOS app_server. This system is really highly modular and flexible.
There are however some advantages and disadvantages. Or let's call them "differences". Given that we draw into a backbuffer and not directly using graphics hardware, we cannot use many of the accelerated features like screen to screen blits or fill rect. On the other hand we don't have the problem of "flickering", as we only show finished content on screen and do the clear-and-paint-again-operation in main memory. The Dano app_server supports this (doublebuffering) as well if you happen to enable it. Note however, that operations like filling a rectangle in main memory is not neccessarily slower than doing it with an accelerated function, it's just that we have to copy the result afterwards to really show the change. Another difference is the "who" does it. If we draw using libagg, the CPU will have to handle all the drawing and put the result into main memory instead of the GPU doing (at least some of) the drawing. This costs another bit of performance, but it's not that bad afterall, given that operations like memcpy and memset that are used for blits and fills are pretty optimized on most CPUs.
For the drawing functions a BView currently provides, a AGG-based rendering engine is probably not really neccessary and will probably also be slower in the end. But it opens up a whole lot of functionallity for future use (native SVG or other vector graphic applications come to mind) and it provides high quality antialiasing with no effort. Note that it currently may look a bit blurry, but this will be fine tuned later on. So much for the first news.
I started looking at a completely other part of the OS once last week: Networking. I knew that it worked more or less on BeOS R5, but I was surprised how well it did under Haiku. Actually I was able to download some images off of google (using an old testapplication I once wrote to learn more about BSD-Sockets) just fine and with some work I was even able to surf the web inside Haiku (more on that below).
Getting networking to run under Haiku needs a bit of manual work, but is not very hard to do in the end. Some of the networking stuff, the networking libraries, will already be built and installed by makehdimage. Other parts like the actual networking core and the net_stack_driver that is used to interface it, need to be added manually. You will need the networking core, the proper interfaces and protocols as well as a driver for a supported network card. All of which can be found in src/add-ons/kernel/network and src/add-ons/kernel/drivers/network. It's best to add the missing targets to the jam command in makehdimage, so you have all compile-time variables set correctly. After compiling and installing (assuming it worked) you will also need to move the net_stack_driver from dev/net to another place, as the network core will try to load all the dev/net drivers and get into a loop when trying to load itself again. Move it to dev/net_stack for example.
To initialize and setup your network connection under Haiku you can write a little Netscript. First you will have to initialize the net_stack_driver by "ls /dev/net_stack" (assuming you put the driver into dev/net_stack), then you can go right to configuring the network card. Use ifconfig to do this. You can use "ifconfig -a" to find out what interfaces can be used. For every network card with a working driver you will get an interface plus the loopback one. In my case this is a RTL8169 onboard gigabit ethernet adapter and the corresponding interface is "rtl81690". To setup the connection you can use "ifconfig <interface> <ip> up netmask <subnetmask>". In my case for example "ifconfig rtl81690 192.168.0.10 up netmask 255.255.255.0". If this works out you should be connected to the network. You can verify that by using "ifconfig -a" again. Your interface should now be up. As a last step you need to define a standard gateway. This is where your internet requests will be routed through. In my case this is my ADSL-Router at 192.168.0.1. A simple "route add default 192.168.0.1" is enough in that case.
If you really meet all those requirements, you should be able to connect to the internet now. But then of course the question comes up: How would this be useful without a browser? Well, you could do some basic stuff like pinging or maybe even running a console based webserver. But that's not as easy to do right now, as webservers are usually (appart form PoorMan / RobinHood) quite big applications, which Haiku may not currently support. The answer is a text browser like lynx or links, both available for BeOS R5. Sadly both did not quite work with Haiku "out-of-the-box". I therefore downloaded the source for links and checked what happened. Links for BeOS is quite net_server specific and the first thing was to disable most of the workarounds for the socket/pipe problems of BeOS net_server. In the end it didn't work either, but I was able to find out why. The cause was the missing implementation of select in the pipefs which was, after learning the concept of select and how it appearantly was implemented in Haiku, relativly easy to implement. Whit the help from Ingo Weinhold it got even easier and correct by now. The result is a working Links text browser that can be run on both, BeOS BONE and Haiku (binary compatible). I will release these binaries (version 0.99 stable and 1.00pre13) on BeBits later on I think.
The next step on this path could be to get the Haiku tree using svn from within Haiku. I didn't try this yet, but it should be possible. For your viewing pleasure: Screenshot 1, Screenshot 2, Screenshot 3 and Screenshot 4.
Comments
Finally something useful to show
27.03.2005 - So this was almost a week without any updates. But there was big progress lately anyway and I would like to explain what happened.
Maybe you remember where we left last time: We were in a pretty much defunct Haiku, with a testapplication running but no input possible. I said last time that the solution for this would be a windowed terminal which would allow to work with Haiku again. The task was clear, and the resources were available, so I started to write a very minimalistic terminal application (later called MiniTerminal). The bits and pecies are all there in the Haiku tree, you just have to pick them up and transform them into something new. This time, I started out with the console driver, the frame_buffer_console and consoled. The console driver is where the instructions are managed and half way executed. The console itself does not draw anything to the screen, but it instructs the module that can draw to screen that it should do so. It also handles cursor positioning and processes VT100 commands like escape sequences and color handling for example. The frame_buffer_console is the module that actually draws to the screen using the VESA frame buffer and a predefined bitmap font. Finally consoled is the userspace application that connects to the input_server or keyboard driver and pushs their input to the console it starts up, which in turn tells the frame_buffer_console to draw the output on screen. This just as a brief into to what parts we need.
What to do with this? If you think about it, the task we need to accomplish is to "redirect" the in and outputs. We need to write a BApplication with a BWindow, that has a BView that can serve as an output (like frame_buffer_console) and as an input aswell (like consoled with the input_server). Creating the application, window and view is not a problem and also runs fine on Haiku. Getting the frame_buffer_console replaced with a BView backend is not that difficult either, if you don't aim for fancy features like selection and copy/paste. The biggest part is to replace the render_glyph function to use the BView instead of doing rendering of it's own. For us, rendering letters on the screen is not a big deal, because we have the app_server that handles this for us. A single DrawString() call will actully be enough. Even easier than this is to replace the input part. We don't need to start the input_server or load a keyboard driver of our own, we can simply use the KeyDown() hook and write the bytes to our master tty. All in all it is more a rewrite to C++ than actually writing something new and you can find the final product in the Haiku tree at /trunk/src/tests/apps/miniterminal.
So what did take so long if writing a terminal is so easy? Now, the fancy and easy functions described above are of course very useful, but they really only worked so well under R5 with the normal BeOS app_server. Under Haiku some fundamental things were missing. First the input_server - BView communication had to be fixed, then pattern support had to be added in the app_server (for FillRect(..., B_SOLID_LOW) to work) and screen to screen blitting had to be added and implemented in the AccelerantDriver too. This may sound like much work, but the fundation of these functions were all already in place. They just had to be extended to include AS_LAYER_SET_PATTERN and AS_LAYER_COPY_BITS for example and call the appropriate functions. I think that they are all mostly working now and GUI applications are possible. The GUI is also fast, as scrolling the MiniTerminal uses CopyBits, which in turn uses screen to screen blit, which is one of those few things that can be accelerated by graphics hardware.
Status as of today: Haiku has a windowed terminal, from where the system is (almost) fully operatable. Now we can start with some real things. Also debugging has gotten easier again, as we now can run (graphical) test applications from within Haiku without having to restart into BeOS all the time. Also we can now use normal printf() instead of the temporary debug_printf, which does not require a serial nullmodem cable anymore and is binary compatible with BeOS R5. This is a big step forward in my eyes. And to please your eyes too, here's a Screenshot of the whole thing. It even has colors, "ls -la --colors" actually ;-).
Comments
So you really want screenshots?
21.03.2005 - Well, I experimented a bit in the mean time and also tried out the drawing code under Haiku.
So, as you may read below, the drawing of colored rectangles worked. Also the line drawing was not hard to fix (as it was already in place), but in the end I decided to throw it away and implement it using the Bresenham algorithm as suggested by a TODO item above the old code (here if you're really interested). It works as expected. On the other hand I got the test application to run under R5 again and this time was actually able to see how it performed. It did not, to the most part. The strange thing was, that the drawing code of the decorator and the view I placed inside the testing application should have triggered all these (2) functions I mentioned. But the only thing I got working was a single black rectangle where the window should have been drawn.
With this, I was pretty much puzzled. I mean, the colored rectangles and lines from the test hacks worked fine and were drawn all over the screen, but these windows just were not. It took some time, but I eventually got behind the problem. As before, it was just because of outdated sources. In the old DisplayDriver API the display mode (screen resolution and color depth) were kept inside the actual driver and synced with the DisplayDriver using special functions. In the new API, it is kept as shared (protected) member called fDisplayMode. As you guess, this member was never used by the AccelerantDriver and so, the DisplayDriver had no idea about the real dimension of the screen. Like, s/mDisplayDriver/fDisplayDriver, and everything magically works. It's always fascinating how little can make such a big difference.
So now we have a nice little test window, drawn by the Haiku app_server, using the AccelerantDriver under R5 (Screenshot 1). As you can see, clipping code is not in place yet (the black triangle that leaps out of the window), but this is not an issue to address right now. What is obviously missing is font stuff. This is by design currently, as these require again other (currently unimplemented) functions to work and are therefore disabled.
You may think now, that this looks like what you may have seen earlier, on other app_server screenshots, and it actually does. But this time, it's drawn using real hardware and using accelerated functions. The cooperation between BeOS R5 and the Haiku app_server, by the way. is not as big as it may look on the screenshot. As the input_server does only serve the BeOS app_server in this setup, drawing the window is pretty much it. No interaction is possible and the BeOS app_server just "overdraws" the new window as soon as it updates this part of the screen. But it looks funny anyway...
What is far more interesting now is of course: What about the app_server running under Haiku? Well, it may be best to take a look for yourself (Screenshot 2). You may again say: But this looks like ... the same! And again you would be right. But this is really a good thing. This screenshot is more a proof-of-concept than a real demo of what's possible, but it's no fake. It was taken using the app_server (triggered by the print screen key that was noticed by the input_server through the keyboard driver loaded in the kernel and finally written to the disk using OpenBFS) all running under Haiku. The debug output in the background comes from consoled rendered into the overlapping VESA framebuffer by the way.
What comes next is a bit more difficult. Stability issues don't allow much more to work in one go currently, but they will be ironed out step by step. But there are other problems coming. This whole Haiku installation gets into some kind of transition, away from the VESA console into an accelerated windowing system. The problem is what happens in the middle of this jurney. To get the screenshot, you have to press the "print screen" button on the keyboard. But also, the input_server has to notice that and send this information to the app_server. But when the input of the input_server is delivered to the app_server, what happens to the console, also wanting some input? Well, the console won't get any. That's also the reason why you see now typed-in commands in the background; this is all running from a script. Again we're at a point where debugging is difficult. To run tests, you always have to reboot, change the script, reboot again and see what happens. This issue will be solved when the app_server is capable enough to start up a (windowed) console of it's own and handle the input appropriately. One more step to take I guess...
So much for the status update today, thanks for reading. By the way: please don't think that all of this work is done by me. I just put the existing parts togheter. This is only a _very_ small part of the whole thing after all.
Comments
Running the Haiku app_server and drawing with the AccelerantDriver
20.03.2005 - This post is a "fix" for the last one and includes news about what I got working this weekend.
First of all, I have to correct what I wrote about the non-execution of the main. It turned out, that it was a stupid error on my side. As I wrote last time, I forced the applications to link against the Haiku libroot and libbe. I did this by using the -nostdlib switch to gcc. This works well to exclude -lroot (the BeOS libroot) from beeing linked in, but it unfortunately does exclude start_dyn.o and crtn/ctri.o aswell. The exclusion of start_dyn.o will cause exactly what I described below, the main not executing, because the executable won't have a _start symbol. The exclusion of other objects can cause global variables not to being initialized and all sort of strange things can happen then. So this way is definetly bad.
Well, how to do it then? You could of course just link in all these objects by hand, but actually, it can be done far easier. As you may know you can specify additional search-paths for includes (using -I) and libraries (using -L) and a simple "-L." while having the target libraries (or links to it) in the same directory appearantly does the trick. Maybe this is again all wrong and it just works now because Axel added the missing symbol to libroot, but in the end it works now and that's what's important...
Now to the more interesting part of this entry: the news. I tried some things this weekend and actually got the app_server to run more or less reliably on my Haiku partition. I even got rid of the RUN_WITHOUT_APPSERVER parts and the app_server is now launched in the Bootscript as it is normally on any BeOS installation. BUT, this does not mean that any GUI or even BApplication's are now running on my Haiku installation. The app_server does do quite a bit more than just draw the BeOS GUI. As it's name suggest, it manages applications. It handles the initialisations of BApplications, it handles the creation and communication of BWindows, BViews and the like.
The part that is currently running is the managing stuff. Nothing (or almost nothing) graphical is currently working, because this would be handled by the different "DisplayDriver" subclasses. All of them work under R5, but only one is really usable under Haiku. The (still) default driver is the ViewDriver, that draws GUI stuff into a BWindow / BView combination under R5 and of which you may already have seen some screenshots. Then there is a BScreen based one, a BDirectWindow based one and one that can utilise a second graphics card you have installed in your computer. As most of these require an underlaying app_server, they can of course not be used under Haiku.
This is where the AccelerantDriver comes in. As I got both the radeon driver and the radeon accelerant working under Haiku using the slimdemo application, it should be possible to do the same with this AccelerantDriver. Well, this probably sounds a bit easier than it actually is. Two main problems that appear here are: 1. The AccelerantDriver is not complete and a bit out of date compared to the other DisplayDrivers and the DisplayDriver interface itself (of which the AccelerantDriver is a subclass) and 2. it's quite hard to find out wether things are really working because there is no real testing possible. This is because it's not sure wether something does not work because of the application failing, the BApplication, BWindow or BView management failing or actually the AccelerantDriver not drawing anything.
The first problem was fixed over the last few days by updating some obvious things here and there, always with the help of the slimdemo source, which essentially needs to do the same steps to get into a working state. So the AccelerantDriver is now up to date and has all the virtual functions that are required for it to work as a DisplayDriver implemented. But you see, with problem 2 at hand, I couldn't check wether any of this stuff was really working. The only thing I could more or less test, was to set a video mode via the radeon.accelerant. After getting everything in place and activating the app_server in the Bootscript, it started up, loaded the accelerant and set a video mode. It was just a gray and empty framebuffer at first, but as I discovered that I could set the same VESA mode as I did with the video mode, the two framebuffers overlap each other to the most part. This way I got an accelerant video mode in the foreground (running at 640x480x32bit and 60Hz) and the "old" 640x480x32bit VESA mode in the background (where the console is drawn into). So I could experiment with the app_server and still have the console visible in the background, which is a far better testing environment as relaying purely on debug output. And this is pretty much it for now to the graphical part of Haiku. No rendering is done at all, but at least the video mode is set and appears to be working.
But wait, there is of course another way of testing the AccelerantDriver. Why not run it directly under BeOS R5 in parallel to the normal app_server? I guess this was the way the orignal author of the AccelerantDriver tested it. And after some experimenting it worked out. The Haiku app_server ran from a BeOS Terminal, opening the readeon.accelerant and setting the video mode. If you tweak that to run at the same resolution and color depth as your normal BeOS desktop, you get pretty much the same as before under Haiku. A normal BeOS desktop with all your applications visible in the background, and a Haiku app_server running in the foreground (not doing anything...).
As you can imagine, this is a very convenient way of testing the functionallity of the AccelerantDriver. You don't even have to reboot, you can just kill the Haiku app_server, switch to another workspace that has a different screen resolution to reset the video mode and you're back in normal R5. From there you can change some lines in the driver, recompile and just rerun the whole thing to test again.
This way it was possible to finally find out why nothing was actually drawn using the accelerant (some test hacks and the "DRAW_TEST" should have triggered at least some rectangle drawing code, but nothing happened so far). In the end it was a simple "const" qualifier that was missing from FillSolidRect in the AccelerantDriver. It must have changed in the DisplayDriver and nobody updated it in the AccelerantDriver. So now, finally, the Haiku app_server is able to draw colored rectangles!
That's the current state of things. The AccelerantDriver works with the Haiku app_server and is able to set a video mode and work with Haiku and BeOS R5. It is able to draw some simple colored rectangles to the screen from within BeOS R5. I don't know yet if it also works under Haiku as I didn't test that yet. But I guess it is only a small step to get it working under Haiku as soon as it's working under R5, as the interface to the accelerant is the same. I will fine tune my work on the AccelerantDriver and then eventually commit everything back to the Haiku tree.
Again, please place any comments or questions in the Haiku comments forum.
The path to real hardware accelerated graphics under Haiku
17.03.2005 - I recently asked myself how far you can really go with the Haiku kernel right now and started to put some things togheter. My conclusion: You can do far more than you'd expect at first sight.
At first I had a normal Haiku installation (compiled from source) installed on a partition of it's own and made with makehdimage. It booted fine, switched to VESA, displayed the logo and ended in the graphical (actually kernel debugger) frame-buffer shell. What you can do from there is quite limited if you do not add anything. The first thing to add is for example all the shell tools that can be compiled from the Haiku source and some of the test programs. When you go into the source and enable the input_server as the input source you can also enable keymap support.
Well, this is the basic stuff you can do, but this is not really interesting (fastcinating to see how well it works, but after all not very interesting). Far more interesting is it to get the things going, that aren't working by default. GCC for example. On the first try I installed the current GCC 2.9.3. While actually running, it wasn't able to compile anything because of some dependencies I appearantly didn't meet. Installing the original 2.9-beos version that comes with the R5 development tools worked well and I was able to compile some small "hello world" like programs. Anything more complex failed because of problems with gcc itself or because the apropriate build tools (make / jam) didn't work. So bootstraping anything from within Haiku was not an option. As I had no debug output at that time I wasn't able to see why exactly it failed.
After I bought a serial nullmodem cable and relocated the second PC I had standing around I finally got the important debug output that I needed for the other things I wanted to try. I let makehdimage compile the radeon.driver and radeon.accelerant and wanted to see if it's possible to get them working. To test it's functionality I wanted to use the slimdemo from the sample code archive, as this is supposed to run pretty much with this level of BeOS as Haiku has now (i.e. no app_server). Of course, this plan did't really work out. The driver failed to load at the very first stage because of some missing symbols.
After taking the source directly and using another setup that explicitly forced it to link against the new Haiku libkernel.so and libroot.so I had the first bit of success: the driver started to load. The next problem that araised was that the driver tried to allocate more memory than available to the vw to get it's PCI buffer (8MB) up and running. This was fixed by increasing the (currently hard coded) amount of kernel memory and adding the appropriate "bin"'s to the vm. After this hurdle the driver loaded successfully. But not only the driver was loaded but also the PCI bus modules (that worked right away).
Everything seemed well and I wanted to also get the accelerant to load by using slimdemo (instead of ls /dev/graphics). This step proved to be a bit more complicated than I expected. I knew that most of the command line programs worked fine under Haiku, but the slimdemo just didn't. It fired up the debugger right after starting and was killed by it. I really had a hard time to find out that appearantly the mechanism to load a program was a bit broken under Haiku (or my linker scripts were not the right ones to build a proper Haiku application). The program loaded, but always ran the first function it found (instead of the "main"), which failed because of some empty pointers. Only after moving the main function to the top of the sourcefile it did cooperate at least a bit.
As before, slimdemo loaded the radeon.driver successfully, but appearantly it failed when actually opening the device (Radeon_FirstOpen in that case). It again took quite a while to trace the error back, which had actually nothing to do with Haiku. It was just two missing "return B_OK;" lines in the driver source (4.1.0.1 by the way, as the Haiku tree had no newer version). After this was fixed the driver loaded and opened successfuly.
As you guessed it, the problems started again when getting the accelerant to work ontop of the driver. As a little background one may has to understand the difference between the driver and the accelerant: The driver is loaded and operates in kernel space and handles the low level comunication with the graphics hardware (or any other hardware for that matter). The accelerant is the drawing interface of the app_server and works in user space (where the app_server and all the other applications are loaded). The interface between these two parts of the graphic driver is the "/dev/graphics/xy" structure (using read / write and ioctl's) and shared memory areas.
After refactoring the build system for the accelerant in the way I already did with the driver, the accelerant started to load and, thanks to the temporary debug hack, did also output some infos. It appearantly failed when trying to clone memory areas for shared use between the driver and the accelerant. To my surprise I discovered that it was not a B_BAD_VALUE or B_NO_MEMORY error I expected. Communication between the accelerant and the driver worked well and the area id's were transmitted correctly. After checking the headers I found out that it had to be a B_NOT_ALLOWED error. I checked that with the BeBook and found nothing about it, so I looked into the vm source. Appearantly the way areas are shareable defferes between Haiku and BeOS. Haiku requires the areas to be explicitly created with the B_USER_CLONEABLE_AREA flag (meaning cloning an area in kernel space from user space is allowed).
After getting this final bit ironed out it really worked. The slimdemo loaded the radeon.driver (which in turn loaded the PCI modules), loaded the accelerant, found the entry point and used the accelerant hook's to draw using real hardware acceleration!
That's the current state of my investigations and I'm currently trying to get the app_server running with the AccelerantDriver too. But I'm stuck with the same problem again: the not-execution of the main. As the app_server is quite a bit bigger and more complex than the slimdemo, just moving the main around will probably not help much. But I'll certainly keep trying and report back when I am successful.
That's my report so far. I hope you enjoyed the news and maybe you get inspired to try out (and report back) some things of your own. A big thank you to all the people involved in getting Haiku forward, it is very impressive what can be done by so few poeple. I want this to be a head's up and a reply to all those who still belive that Haiku achieved nothing more than a BFS replacement and a few Translators.
Please place any comments to this weblog entry and questions about technical details in the Haiku comments forum.
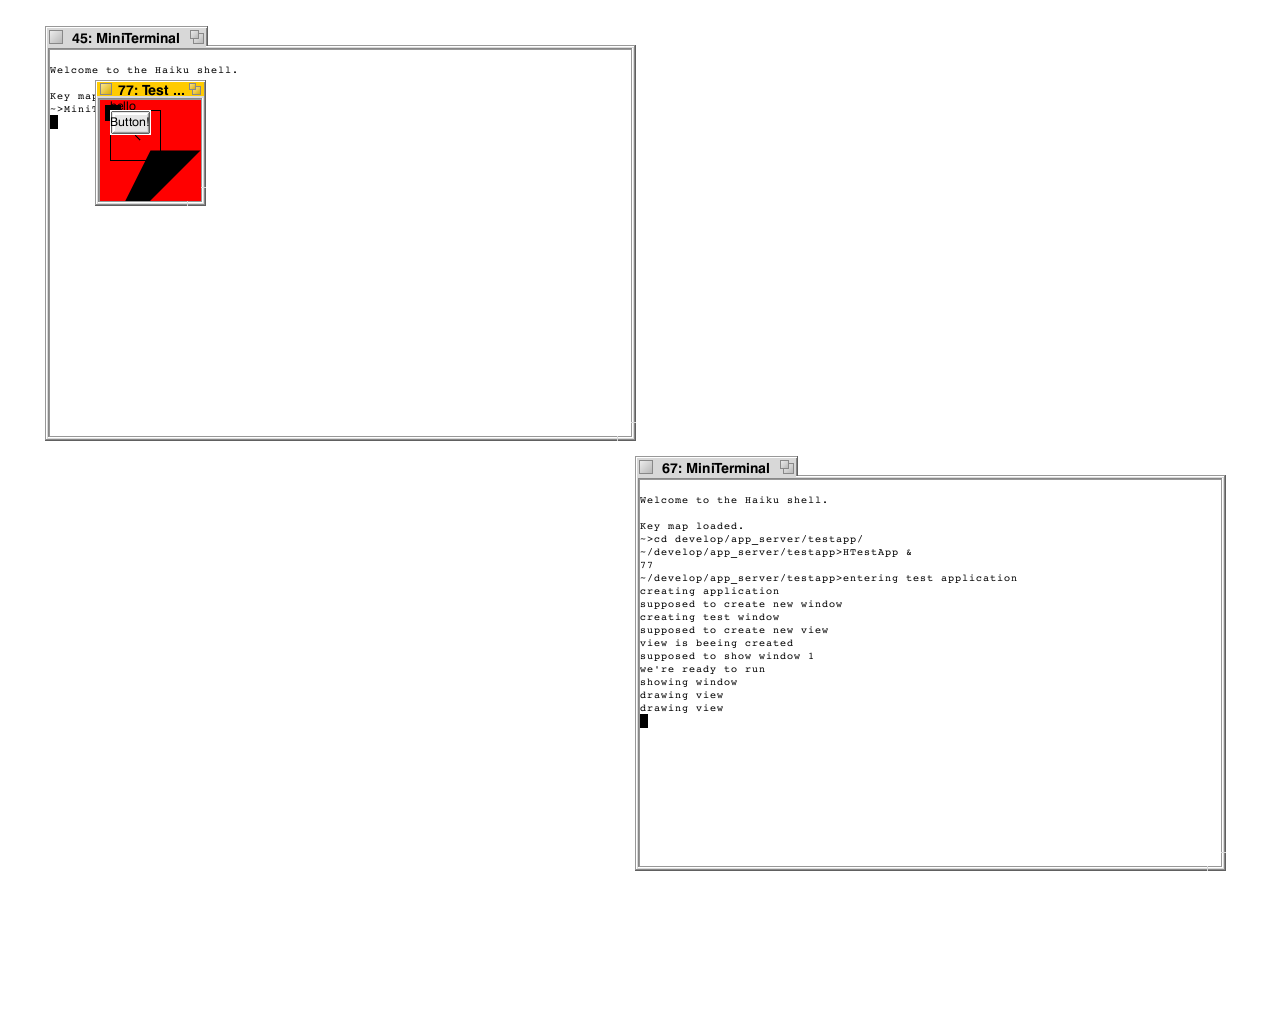
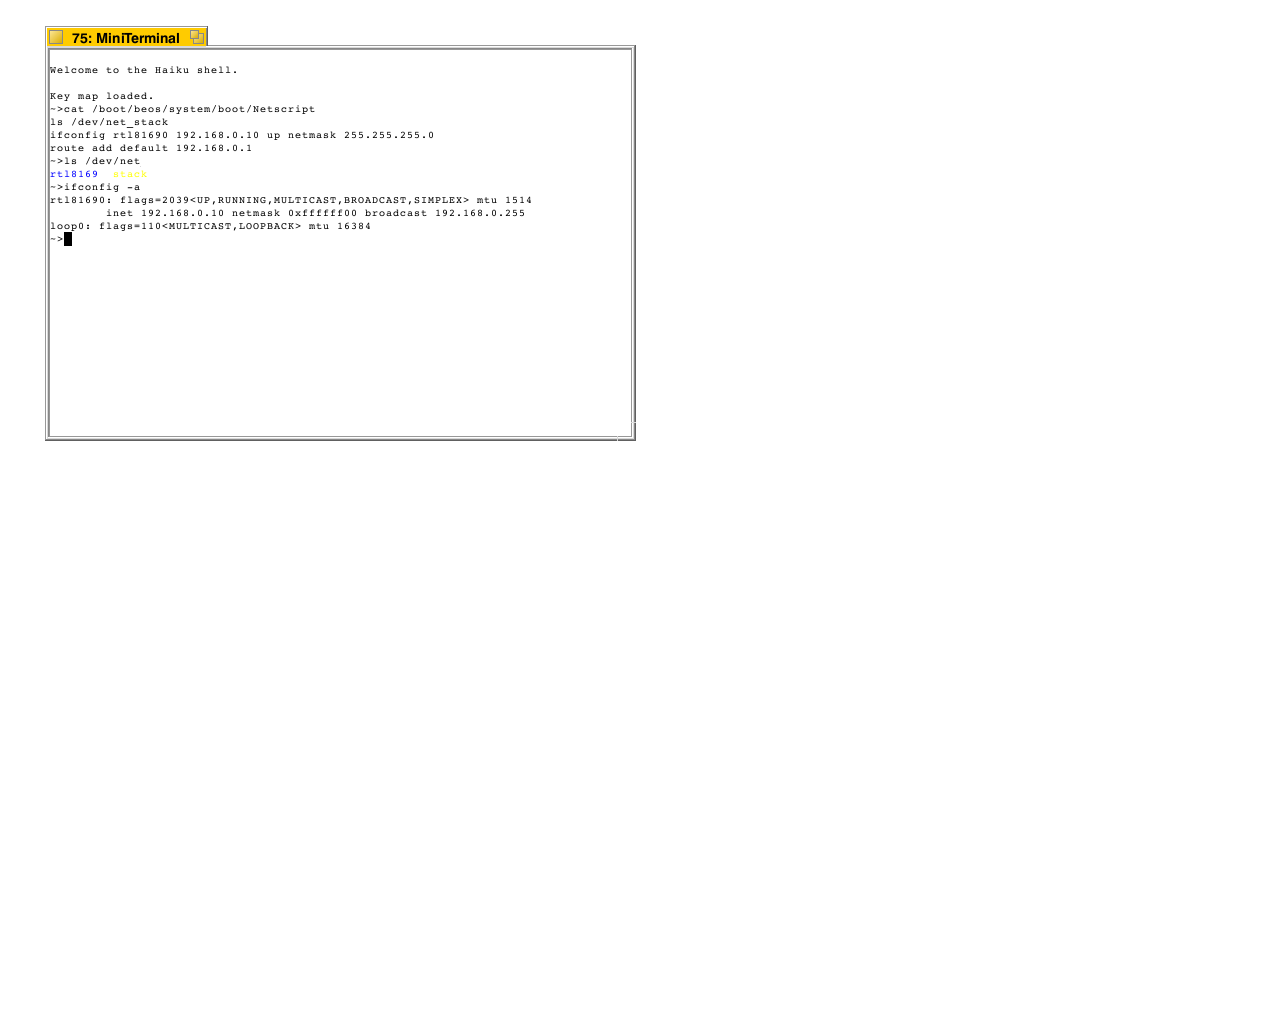
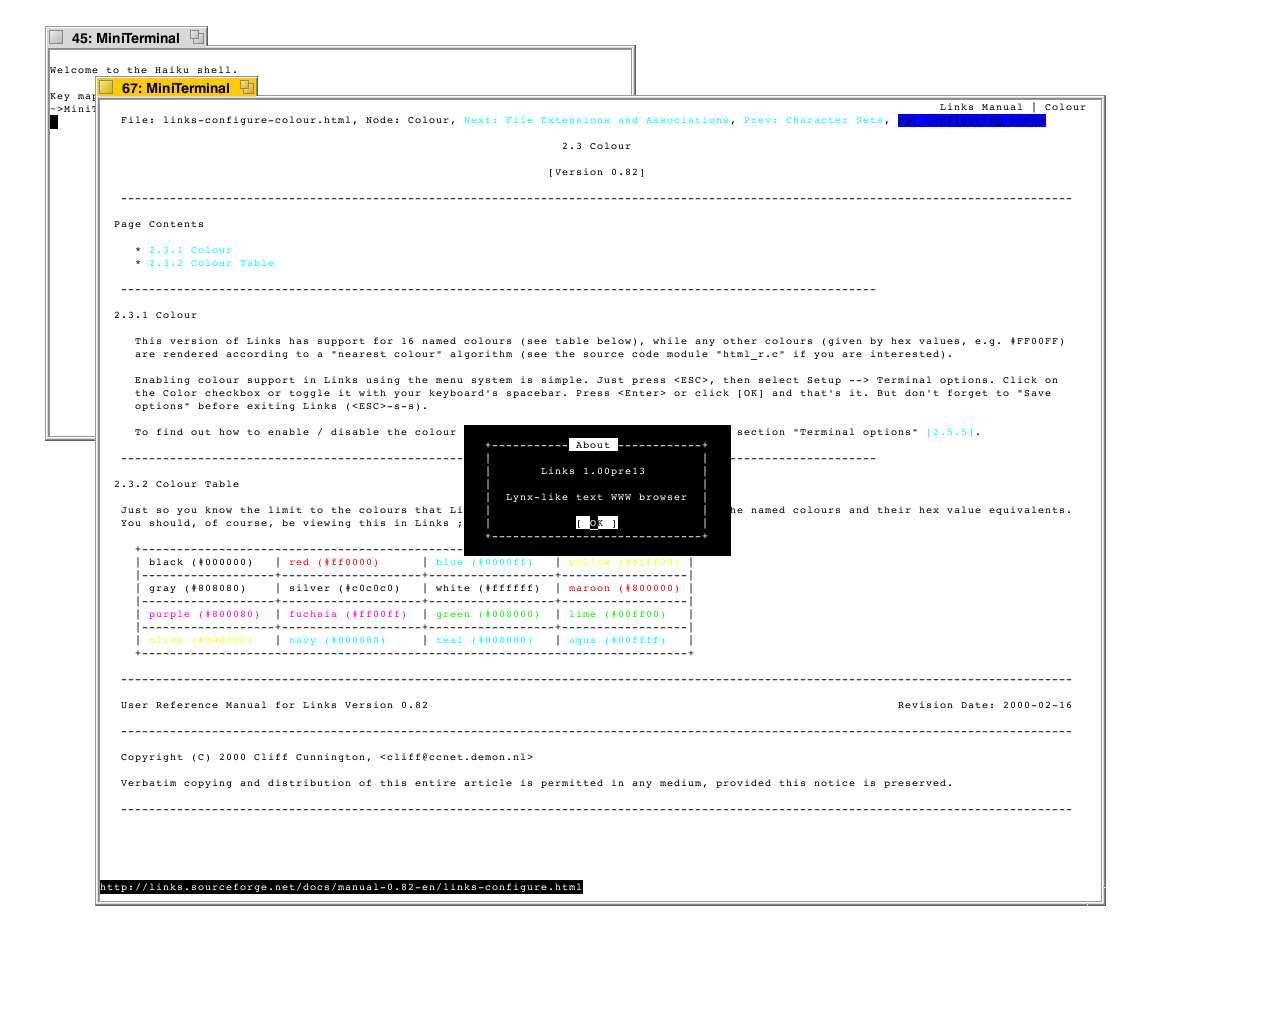
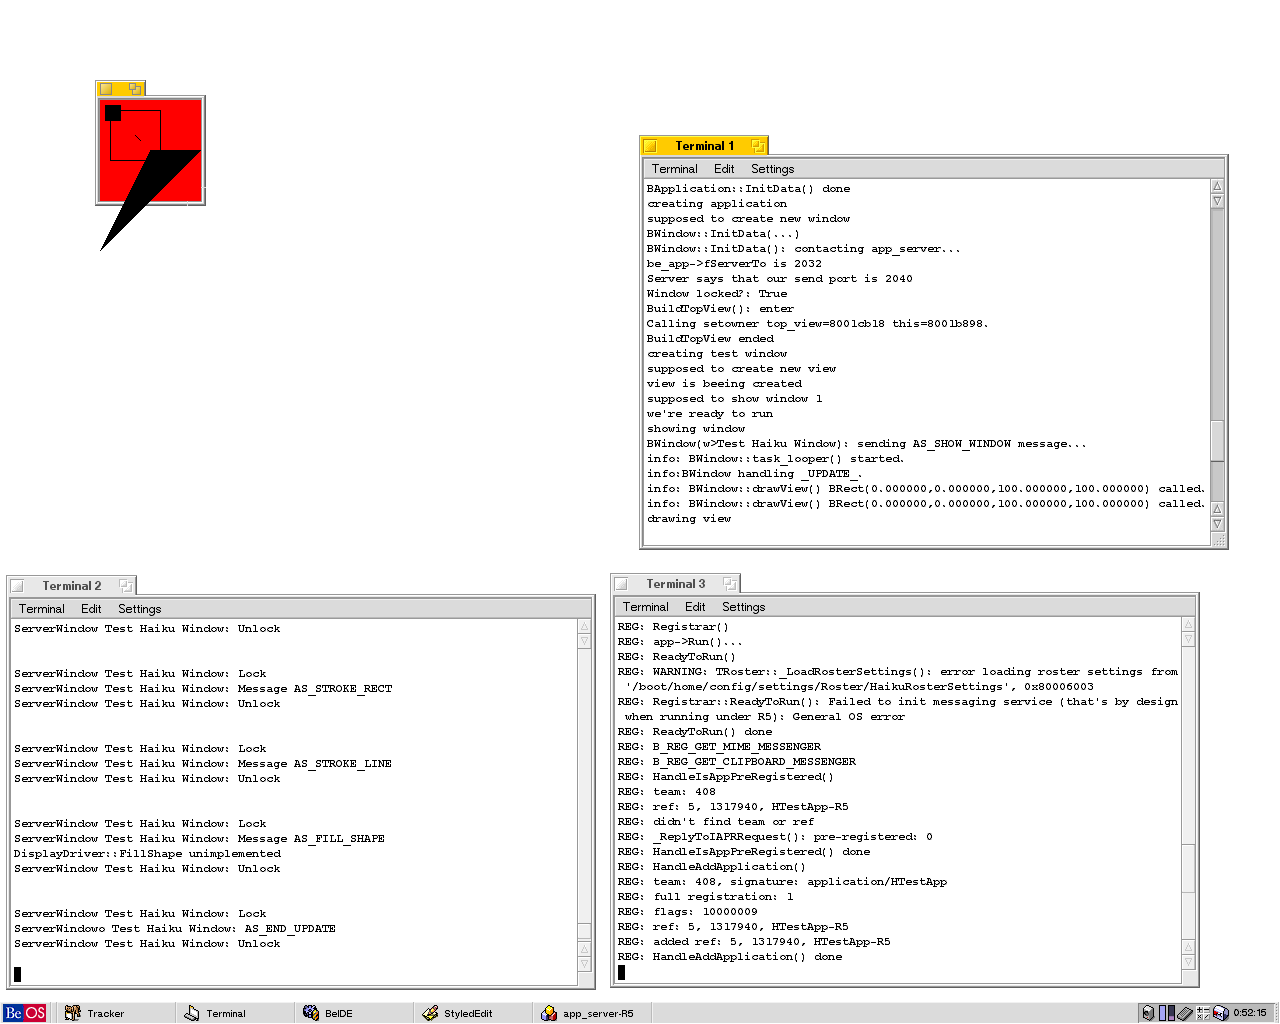
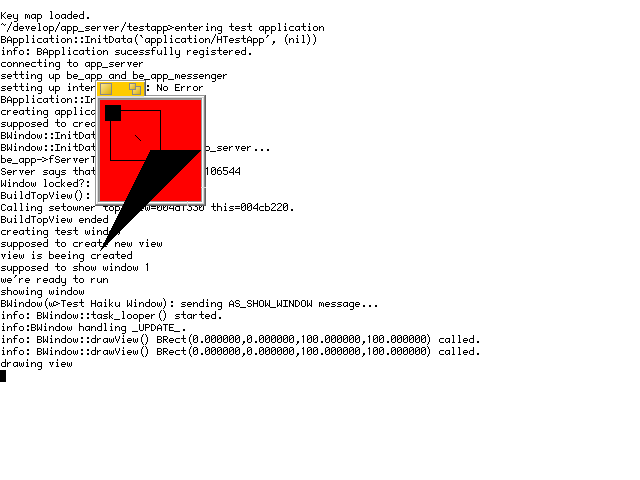